a rotating (holiday) gallery wall + homework space!
- thechaoscurated
- Oct 26, 2022
- 7 min read
OK you've seen a rotating gallery wall... but have you seen a gallery wall with a holiday theme, local art, frame TV (that doubles as a computer monitor) - all on top of a desk designed for homework?? Now you have!

I’m not sure where this idea came from (I mean, the concept of changing out pictures is out there… but holiday wall? Not sure. Convinced I’m a genius.)
the space
I'll start by introducing the space! This is a little alcove in our main family room that is also the first wall you see when you walk into our main living area. Basically - it's highly visible. It's also therefore in a PRIME location for a homework spot. Technically just to the right is a large kitchen island, so we often line our the kids up there for homework... but sometimes... they require some extra space to focus. ;) You get it.
So this is what that space looked like the week we moved in (yeah we moved in a few days before Christmas!), so you can see it's a pretty decent size alcove (humans and tree for scale).

the desk
Even though I knew that I wanted it to be a little homework corner, I wasn't sure how to design the tabletop for the 'desk', and it seemed like that should come first. The good news is that Michelle and her team at Lively Haus knew exactly how to do it - with a custom 'pencil desk'!
It took a few attempts to figure out all the things... like - what would look good in the space ("L" shaped or not)? What would make it most functional (drawers!)? And of course - what would match my style (which can annoyingly very often be a 'know it when I see it' situation)?
But after a couple mock ups (including a lighter "L" shape desk that we repurposed elsewhere), we arrived at this idea...

And note this is the royal "we" (since Sodi at De Lucio's Furniture actually made it come to life)! And I wanted something with a little edge to it, so he did a little (well, a lot of) millwork that you can see above and also painted it a deep black. He finished it off with some hardware from on one of our favorites spots, Rejuvenation. If you want to see the inside of the drawers, scroll all the way to the bottom (as I'm thinking most of you are here for the gallery wall, not the drawer organization!).

And then below it, you'll see some seating. We had these hexagon ottomans from Blu Dot back in our house in LA, so we just repurposed them here. (Note that in LA, we were actually using the two together as a coffee table... as it was the right size for the small space and avoided any coffee table head injuries!) But for this space, if I was buying something new, I'd probably do something similar but make sure it had storage. I'd also likely maybe change up the color.... Otherwise, this seemed like the perfect unobtrusive solution for seating!
the gallery!
OK and now, the stuff on the wall! First… the Samsung Frame TV. It's just as great as it sounds. It literally looks like artwork but is a TV (or computer monitor). I am late to the party here, but we found a 32" one at a Best Buy 'open box' sale, and then we got the frame on Amazon here. You'll see we put it pretty close to the desk and centered it between the knobs - with the idea that 95% of the time it serves as artwork, and the other 5% it serves as a computer monitor for the kids doing homework. Therefore it had to be close to the desk and centered for the ability to sit between the knobs to work. Also, eventually we'll drill into the top to drop the wires down to the outlet below. Just pretend like you can't see it for now. ;)
And artwork for the frame is easy to find - just search "Samsung Frame TV art" on Etsy... and for just a few dollars, you can buy and download some original artwork that fits perfectly in the frame! Our Halloween art was from these Etsy shops in case you want some extra inspo: 96th Avenue, Gallery 130, and Aims Camille (all pictured above).
Next up - all the local non-seasonal art! If you've read my Fall Purist List post, you know that I love, love, love Udarbe Studio. She sells a lot of curated vintage finds, but she also sells vintage frames with her own artwork inside!! You have to be quick to grab these pieces at the drops (I set an alarm, and refresh, refresh, refresh until she posts!), but it's so worth it to have such cool pieces that are completely one-of-a-kind! I actually made my first two purchases (the checkered piece and circle of dark waves) without knowing that I was creating a full gallery wall... but it just made sense once I saw them all together! I love the mix of textures and vintage and modern pieces on the wall.
The mirror is Room and Board circa 2013 - but I still love it (and thought it was the perfect large piece to balance all the artwork).
And then, the seasonal pieces! These are the pieces that I (obviously) plan to rotate in and out and the seasons change.
The cat picture I'm most proud of... only because I found the frame at a garage sale (channeling my inner Lauren of Udarbe) for a quarter, and then I found a super cute print on Etsy to fit it (here). You may be able to tell in the photo, but the way the artist drew the hair on this cat is just so real that it makes you want to shrug up your shoulders.
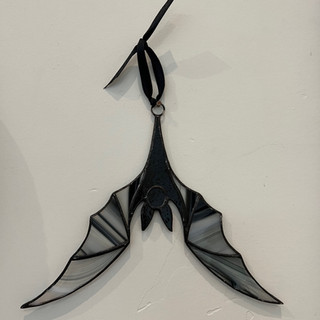
The hanging bat was added to bring in a new dimension, and it's actually stained glass. You can tell it's handmade, and it arrived in just a couple days (which is key when you're a last-minute shopper like me!). A note that I did add the ribbon to make for easy (and cuter?) hanging.
The spider web was a little different than I envisioned (I mean what can you really expect from the title "real spiderweb"), but the story in the comments from the artist (about finding the web in the forest and working to bring it home safely on their bike for this transfer into art) was a real selling point! It was the only listing for spider webs by this artist, but amazingly you can search "real spider web art" in Etsy... and lots of people are selling these items... (who knew??)
And lastly, my little skeleton. Another good dimensional item. I'm embarrassed to say that I forgot to write down the name of the vendor, but I got this at a local annual market called "Junk in the Trunk". And if you're in AZ, try to make it to one of these markets, as they are are such an easy way to support local (and get really unique items)!

Oh and I also realized that I forgot to take pictures of the actual layout and hanging process (will do next time and create a mini post - you know I have more than one Halloween gallery wall lol). But the process was pretty casual - with a few easy steps:
laying it out on the floor (lining up some items, not lining up others)
tracing the layout (meaning tracing each item's outline and then writing in the middle what it is) it on top of butcher paper
taping up (with painter tape) the butcher paper according to exactly where I want it to sit
using a variety of nails and placing them where they belong on the outline of each piece of artwork (this may be obvious, but that means looking at the back of the artwork to see where the nail will be, and then measuring and marking that exact location of the nail for each piece)
hammer those little nails into the spots you marked, and then tear down the paper before you hang up all the artwork
ta da!
And a reminder that (and what I love about these gallery walls) - nothing has to be perfect. I like to align some of the art vertically or horizontally, but not all of it. Meaning that it actually makes sense if it's not lined up... which is kind of awesome for someone like me that is always in a rush to get something up right when I think of it! :)
OK and lastly for those that made it this far, a picture of what I'm keeping inside this pencil desk. You know, for those of you (like me) who are in to seeing how other people organize.
Spoiler alert - it's more than pencils (but there are a lot of pencils) in the "pencil desk". We've put in everything we can reasonably fit that we use every single day.

In this left drawer, we put in all the school supplies - pencils, glue/scissors, crayons, markers, dry erase supplies, and colored pencils.

In the right drawer, we put in includes some "other" items. Including the Samsung keyboard and mouse, plus then sunscreen (Arizona living!), the magical roller to remove dog hair (3 giant furry dogs' hair) from the couch, an extra diaper in case we're too lazy to go to the baby's room from the family room, wipes (for literally everything), and then alllll the hair supplies. I hate that we do hair in the family room every day, but with four little kids rushing to get ready.... it's what we do. Every single day.
So there you have it! A functional little alcove with a hidden homework desk and a rotating holiday gallery wall! Can you tell I'm SUPER proud?? I'll keep you updated as the seasons pass (so let's all have good vibes that I'll be able to actually change out art seasonally - and not have a skeleton in the background of all the Christmas pictures).


